S'mores Cookie Recipe
This s'mores cookie recipe is the perfect nostalgic dessert! With a delicious graham cookie base, melted dark chocolate, and homemade marshmallow frosting, you'll be the talk of the cookout! Everyone will be asking you for the recipe!
Print Recipe
Ingredients
Cookie Dough Ingredients
- 1 stick butter softened
- 2 cups brown sugar
- 2 tbsp honey
- 2 eggs
- 1 tsp vanilla pure
- 1.5 cups all-purpose flour
- 1.5 cups graham cracker crumbs store bought or finely crushed handmade
- 1 tsp cinnamon
- 1 tbsp cornstarch
- 1 tsp baking soda
- 1/2 tsp kosher salt
Chocolate Base
- 2 cups dark chocolate chips or wafers melted (we love Ghirardelli dark chocolate)
Marshmallow Frosting
- 1 cup salted butter 2 sticks, softened
- 2 cups powdered sugar
- 13 oz jar of marshmallow creme
- 1 tsp vanilla pure
Instructions
Making the Cookie Dough
- In your mixer, beat together the brown sugar and butter until light and fluffy.
- Add in the eggs, one at a time.
- Mix in the honey and vanilla.
- In a separate bowl, whisk together your dry ingredients: all-purpose flour, graham cracker crumbs, cornstarch, kosher salt, baking soda, and cinnamon.
- Add your dry ingredients into the wet ingredients, mixing in about 1 cup at a time. Mix just until well blended, careful not to overmix.
- Place your cookie dough in the fridge to chill for at least one hour.
Baking the Cookies
- After the dough has chilled, preheat your oven to 350 degrees.
- While the oven is preheating, use your cookie scoop or a large spoon to portion out 24 cookies onto a baking tray lined with parchment or wax paper. Shape them into dough cubes that are about twice as tall as they are wide.
- Place the dough cubes in the fridge until ready to bake. Your dough should stay in the fridge until it's going directly into the oven.
- Once the oven is preheated, place 6 cookie cubes on a large baking tray lined with parchment paper. Bake one batch at a time to ensure more even baking.
- Bake for 12 – 15 minutes. Bake until the edges are slightly starting to crisp but the center still looks shiny and soft.
- Let the cookies rest on the baking tray for 15 minutes before moving to a cooling rack.
Adding the Chocolate Base
- Once the cookies are mostly cooled, line baking sheets with wax paper.
- Using a whisk, melt your chocolate over low-medium heat in a small saucepan until smooth.
- Use a large spoon to add about a tablespoon of melted chocolate (about half the size of the cookie) onto the wax paper and then gently press the cookie onto the chocolate. Once the baking tray is full, move it to the fridge or freezer for at least 20-30 minutes to set the chocolate.
Making the Homemade Marshmallow Frosting
- While the chocolate is setting, you can create your frosting by combining your marshmallow creme, powdered sugar, butter and vanilla in a stand or hand mixer with a whisk attachment.
- Mix on medium-high until there are no lumps and the frosting is light and fluffy, about 2-3 minutes.
- After the chocolate is set, you can begin adding your marshmallow frosting.
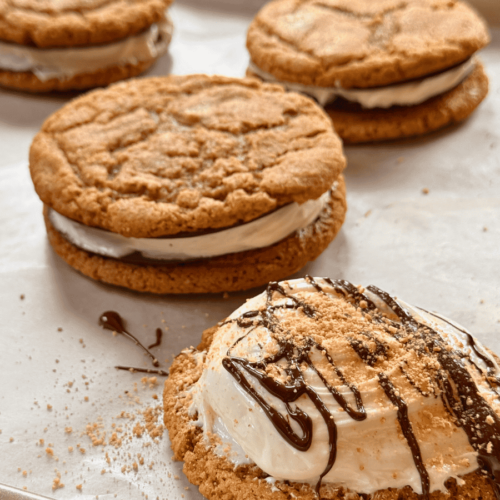
- For frosted cookies, add a couple heaping spoonfuls to the top of the cookie and drizzle with a little bit of melted chocolate. Garnish with graham cracker crumbs if desired.
- For sandwich cookies, add a large spoonful to the chocolate side of a cookie and top with another cookie, chocolate side facing inwards.
Storing the S'mores Cookies
- Frosted cookies: Store in the refrigerator in a single layer in an airtight container. Best eaten within 3–4 days.
- Sandwich cookies: Store in the refrigerator in an airtight container for up to 3-4 days.
- The cookies CAN set out at room temperature for several hours (especially if you're having a grab-at-your-leisure cookout), but for long term storage, keep them in the refrigerator.
Notes
Tips for making S’mores Cookies
- Buy pre-made graham cracker crumbs to speed up the process. If you don’t have them on hand, but have graham crackers on hand you can use those. I recommend blending in a food processor so they come out as a fine texture.
- Chill the dough for at least an hour or two before baking. Chilling cookies allows the flavor to develop well, it makes the dough easier to work with and it keeps your cookies from spreading too thin while baking.
- Bake quicker: I like to get two trays rotating when making these cookies. While one is baking, the others are cooling on the tray until it’s time to move them to the cooling rack. Once the ones that are cooked are cooled, it’s time to get another batch in and I can use that cooled baking tray.
- KitchenAid Mixer – my mixer has been in use for decades and still going strong!
- Adjustable Measuring Cup – this is perfect for the honey! I use this anytime I need to measure something of similar texture of honey, such as peanut butter, sour cream, etc!
- Stackable Cooling Racks– A life saver for a small kitchen with minimal counter space!
- Large cookie scoop – large cookies are my go-to and this scoop has worked really well
- Glass Mixing Bowls – this set comes with matching lids, which is super helpful
- Large cookie tray – work great for baking larger cookies
Servings: 24 cookies (or 12 sandwich cookies)